

Introduction
Congratulations, you chose the best laptop - the Lenovo Thinkpad X220. Below is a collection of information, tips, and tweaks for your X220. Some of this information is applicable to other Thinkpads and laptops in general.Displays
OEM Displays
OEM displays are limited to 1366x768; IPS and TN options available. Models from LG begin with LG125WH2 and end with four characters. Information of models collected from datatsheets are below. Color gamut (area) is calculated from color coordinates from datasheet and are not 100% accurate.A comparison of SLB1 and SLT3 panel can be found here.
Datasheets can be found here.
| Sub-model | SLB(1/3) | SLB2 | SLT1 | SLT2 | SLT3 | TLB1 | BX125XW01 V0 | LTN125AT01 |
| Tech | e-IPS | ← | AH-IPS | ← | ← | TN | TN | TN |
| Manufacturer | LG | ← | LG | ← | ← | LG | AUO | Samsung |
| Typ. Power | 4.78W | ← | 4.33W | ← | ← | 3.9W | 3.0W | ? |
| Weight max | 290g | ← | 205g | ← | ← | 270g | 270g | ? |
| Contrast Ratio | 500 | ← | 500 | ← | ← | 300 | 200 | ? |
| Brightness nits | 300 | ← | 300 | ← | ← | 200 | 200 | 200 |
| vs sRGB | 69.66% | ← | 69.81% | ← | ← | 64.80% | 63.58% | ? |
| vs aRGB | 51.64% | ← | 51.75% | ← | ← | 48.04% | 47.14% | ? |
| vs NTSC | 49.34% | ← | 49.45% | ← | ← | 45.90% | 45.04 | ? |
| Compatibility | Y | N% | Y | N$ | N% | Y | Y | Y |

Visualization of color gamut in CIE xy colorspace
Notes
$ - Mounting tabs on top and bottom
% - No mounting tabs
- IPS panels have a tendency to develop bright spots, possibly due to pressure on the LCD. There is no known fix.
- SLB1 is noted for ghosting.
- SLB3 has no ghosting.
- SLT1 has no ghosting and has reduced power consumption and weight due to use of newer AH-IPS technology.
LG125WH2-SLB1 Measurements
Measurements of the SLB1 panel in my X220 using a X-Rite Colormunki Display colorimeter are here. You can find a color profile for my display here. Brightness was set at 6 out of 15. The huge dE on highly saturated colors is due to the limited gamut of the display.Some additional measurements of my calibrated display.

Brightness is more or less linear. Contrast ratio more or less remains the same.
FHD & WQHD
Modifications to upgrade screen to FHD (1920x1080) and WQHD (2560x1440) exist. These rely on the Display Port from the docking connector instead of LVDS used for the original display. It is not posible to use LVDS for resolutions greater than 1366x768 since Lenovo cheaped out and decided not to route the second LVDS lane. FHD/WQHD mods are not covered here. Your search engine is your friend.Other notes
- Intel Graphics Control Panel -> Power -> Power Source: Battery
- Disable "Display Refresh Rate Switching" to stop it changing refresh rate when on battery
- Disable "Display Power Saving Technology" to stop it changing colors on your screen when on battery. Claims to save power but it does hardly anything but annoy you.
- Refresh rate other than 50Hz and 60Hz is not possible. I have tried everything from fake EDID to fake drivers with no luck.
- I move the taskbar to the left hand side to save precious vertical space. Darn you 16:9.
- The SLB1 LCD uses about 1.5W at minimum brightness and about 5W at maximum brightness according Lenovo Power Manager. This agrees with values in the datasheet.
- There is a small trim pot on the LCD controller board which controls gamma.
Keyboard
All keyboards FRUs for the X220 can be found here. From left to right, the manufacturer is NMB, ALPS, Chicony. NMB keyboards is said to provide the best key feedback, YMMV.The blue "ThinkVantage" button can be remapped to do something useful by changing the below registry value to your favorite application/script. Personally I have it set to turn off my LCD.
HKEY_LOCAL_MACHINE\SOFTWARE\IBM\TPHOTKEY\8001\File
Trackpoint & Trackpad
Remove mouse acceleration
Guide on how to do this can be found here. This does make using the trackpoint/trackpad on large displays a pain though.I use these settings. (To use this: save the below into text file and change the file type to .reg and open)
|
Windows Registry Editor Version 5.00
;Windows_7_MouseFix_TextSize(DPI)=100%_Scale=x1.5_@6-of-11 [HKEY_CURRENT_USER\Control Panel\Mouse] "MouseSensitivity"="10" "SmoothMouseXCurve"=hex:\ 00,00,00,00,00,00,00,00,\ A0,D3,06,00,00,00,00,00,\ 40,A7,0D,00,00,00,00,00,\ E0,7A,14,00,00,00,00,00,\ 80,4E,1B,00,00,00,00,00 "SmoothMouseYCurve"=hex:\ 00,00,00,00,00,00,00,00,\ 00,00,38,00,00,00,00,00,\ 00,00,70,00,00,00,00,00,\ 00,00,A8,00,00,00,00,00,\ 00,00,E0,00,00,00,00,00 [HKEY_USERS\.DEFAULT\Control Panel\Mouse] "MouseSpeed"="0" "MouseThreshold1"="0" "MouseThreshold2"="0" |
Synaptics settings
- Setup as gestures, sensitivity as you please
- TURN OFF Edge tap filtering
- This causes taps at the edge of the trackpad fail because it limits the tap area on an already small trackpad
- Similarly this causes half of the gestures to fail because it limits the gesture area on an already small trackpad
Trackpad firmware
Lenovo has released a firmware update to stop the trackpad interference when using the Ultraslim 90W AC adapter. Firmware and instructions can be found here.RAM
- The X220 can run up to 16GB (2x8GB) at 1866MHz DDR3.
- Use an unlocked BIOS to use 1600MHz and 1866MHz RAM.
- Install the original 1.43 BIOS then the unlocked 1.43 BIOS. Download here MD5 hash: 38ae7f20e1dfa6d3b5aa034653e0eec7
- The BIOS will limit RAM frequency to maximum speed in SPD.
- If you are brave enough, you can overclock your RAM by writing new SPD profiles. Info here.
- In the advanced BIOS set 'OneN Mode Support' to "1T" to use a Command Rate of 1T -- gives a small performance increase.
- Always use two sticks even if size/timings are not matched. Dual channel greatly improves GPU performance.
Some memory benchmarks.
TLDR; lower CL = better, duh.
| Config | Read MB/s | Write MB/s | Copy MB/s | Latency ns |
| 2x4GB 1600MHz CL9 | 15440 | 14061 | 15768 | 54.1 |
| 4+8GB 1600MHz CL11 | 14791 | 14023 | 14370 | 59.6 |
| vs 2x4GB | 95.80% | 99.73% | 91.13% | 110.17% |
Notes
- Everest 5.50.2100.0, i5 2520M, Maximum Performance profile, 2 runs
Graphics
The X220 uses the Intel HD 3000 which integrated into the Sandy Bridge CPU. It is not upgradeable, but an external graphics card using the ExpressCard slot is an option.eGPU
Everything you need to know about eGPUs is here. Use Web Archive if the links in the thread do not work.VRAM Settings
TLDR; VRAM settings in BIOS do nothing.| Run | Prealloc MB | Aperture size MB | Max Alloc MB | 3DMark06 |
| Run 1 | 64 | 258 | 256 | 5200 |
| Run 2 | 128 | 258 | 256 | 5200 |
| Run 3 | 128 | 512 | 256 | 5190 |
| Run 4 | 128 | 512 | Max | 5180 |
Notes
- Maximum performance profile, airplane mode, Lenovo Turbo Boost+, 3DMark06 defaults, Intel 9.17.10.4229 driver, 2x4GB 1600MHz CL9.
3DMark06 Scores
TLDR; maximum fan speed = maximum performance. Negligible difference between 8GB and 16GB RAM. X230 is at least 23% faster than the X220.| Configuration | 3DMark | SM2.0 | SM3.0 | CPU | WinSAT* | Driver |
| 2x4GB 1600 CL9 | 5211 | 1757 | 2133 | 3601 | 6.4 | 9.17.10.4229 |
| Rerun | 5178 | 1758 | 2097 | 3578 | 8.15.10.2342 | |
| 2x8GB 1600 CL11 | 5113 | 1717 | 2084 | 3595 | 6.4 | 9.17.10.4229 |
| Rerun | 5077 | 1704 | 2069 | 3579 | 9.17.10.4229 | |
| IGD thermal control: enabled | 5170 | 1732 | 2119 | 3564 | 9.17.10.4229 | |
| Fan BIOS mode, LPL 36W SPL 56W, ~89c, 3D perf | 5388 | 1825 | 2198 | 3613 | 9.17.10.4229 | |
| Fan BIOS mode, LPL 36W SPL 56W, ~92c, App specific | 5307 | 1795 | 2163 | 3601 | 9.17.10.4229 | |
| Fan 64, LPL 36W SPL 56W, max temp ~85c, 3D perf | 5407 | 1833 | 2207 | 3611 | 9.17.10.4229 | |
| X230 3320m 2x4GB 1600 CL9 | 6614 | 2144 | 2862 | 3902 | 10.18.10.4425 |
Notes
* 3D graphics score
- i5 2520M, Maximum Performance profile, airplane mode, Lenovo Turbo Boost+, 3DMark06 default unless other stated
- IGD thermal control - advanced BIOS setting
- LPL - Turbo "Long Power Limit" option in advanced BIOS
- SPL - Turbo "Short Power Limit" option in advanced BIOS
- 3D perf/App specific - 3D options in Intel Graphics Control Panel
- Fan 64 - Level 64 in TPFanControl
Unreal Engine Heaven
TLDR; Negligible difference between 8GB and 16GB RAM. X230 is at least 47% faster than the X220.| X220 | X220 | X230 | X230 vs X220 2x4GB | |
| RAM frequency = 1600MHz | 2x4GB CL9 | 4+8GB CL11 | 2x4gb CL9 | |
| Intel Graphics Driver | 9.17.10.4229 | 9.17.10.4229 | 10.18.10.4425 | |
| Average FPS | 8.2 | 8.1 | 14 | 171% |
| Score | 206 | 203 | 352 | 171% |
| Min FPS | 5.1 | 5.3 | 10.3 | 202% |
| Max FPS | 17.7 | 18 | 26 | 147% |
Notes
- i5 2520M, Maximum Performance profile, airplane mode, Lenovo Turbo Boost+, Heaven 4.0
Storage
Storage Options
- The X220 has a 7mm 2.5" SATAIII slot and a mSATAII slot.
- mSATA drive is bootable.
- The docking connector has SATAIII for use with Mini Dock 3 eSATA port and Ultrabase 3 Ultrabay slot.
- The Ultrabase 3 Ultrabay slot can accept an optical drive or a 2.5" disk caddy.
- There is a mod to add a mSATA slot using the SATAIII port from the docking connector.
Heatsink
- X220 and X230 heatsinks are cross compatible. Below is information on the SV (standard voltage) processor heatsinks listed in the X220 and X230 parts list.
- Do not bother getting a LV (low voltage) processor heatsink, even if you have a LV processor, as only has one heatpipe and thus has worse thermal performance.
- Both 3 and 4 wire fans can have their speed monitored and controlled.
- Look out for a sticker on the heatsink with "Rc=x.xx" on the heatsink. I believe this related to the thermal resistance of the heatsink -- the lower the better.
- The fan speed can be increased to maximum using the Lenovo Power Manager in the "Basic" menu with the "Lenovo Turbo Boost+" option. Alternatively TPFanControl can be used for complete control of fan behavior.
- A higher fan speed = more thermal headroom for Turbo Boost = more performance, at the cost of noise.
- BIOS 1.16 and above change the fan behavior to reduce noise.
| FRU | Laptop | Fan | Model | Blades | Voltage | Amperage | Bearing | Wires | Max RPM^ |
| 04W0435 | X220 | Toshiba | M-235C-1 | 41 | 5 | 0.29 | Fluid bearing | 3 | ? |
| 04W0435 | X220 | Delta | KSB0405HA | 37 | 5 | 0.30 | Fluid bearing | 4 | ~5300 |
| 04W6921 | X230 | Delta | KSB0405HA | 41 | 5 | 0.30 | Fluid bearing | 4 | ? |
| 04W6922 | X230 | Toshiba | 235-1 | 41 | 5 | 0.23 | Fluid bearing | 3 | ~6700 |
| 04W6923 | X230 | AVC | BATA0507R5U | 41 | 5 | 0.45 | Fluid bearing | 4 | ? |

Visual differences between heatsinks. Images stolen borrowed from the internet. (Source: Aliexpress)
Repasting
Stock X220's run pretty hot. Repasting reduces temperatures around 10C temperature and also lowers fan speed i.e. less noise. Procedure takes about 30-60 minutes. Instructions here - section 1120, page 84.| Config | Load Temp C | Delta C | RPM | Speed GHz | Idle Temp C | Delta C | RPM | Speed GHz |
| Stock | 70 | 46 | 3788 | 3.06 | 44 | 20 | 1962 | 0.988 |
| Repaste | 64 | 40 | 3431 | 3.09 | 46 | 24 | 2916 | 3.02 |
| Repaste + 1 spacer | 62 | 39 | 3424 | 3.09 | 47 | 24 | 2940 | 3.02 |
| Repaste – thin | 60 | 38 | 3414 | 3.09 | 46 | 24 | 1964 | 2.99 |
- Pi benchmark software - 4 threads, i5 2520M, no keyboard installed.
- Repasted with Arctic Silver Ceramique 2.
- Spacer involves adding four thin washers on the heatsink bracket to provide additional travel for the heatsink screws i.e. more mounting pressure; makes negligible difference.
- Thin repaste means less paste was used.
- Unfortunately I could not keep the fan speed/CPU frequency consistent as I was using a live Linux OS.
Battery
- The X220 can be fitted with a 3, 6, 9-cell cylindrical battery, and an additional 6-cell slice battery.
- X230 batteries are compatible.
- The slice battery has a capacity indicator and be plugged in and charged separately.
- Cylindrical batteries can be charged externally with a battery charger.
- An X220 weighs 2.54lb or 1.16kg without a battery.
- The 9-cell battery gives the best power/weight ratio.
- Some batteries are affected by a recall.
- Battery charging thresholds, limits, and battery guage reset can be accessed through Lenovo Power Manager.
Battery options are summerized below.
| Battery | Part No. | Cells | Capacity WHr | Weight lb | Weight g | Battery Life* | Notes |
| 44 (or 29) | 0A36305 | 4 | 29 | 0.43 | 195 | 4.1 | Flush with rear and bottom |
| 44+ (or 29+) | 0A36306 | 6 | 63 | 0.80 | 345 | 9.2 | Flush with rear, 0.35" (9mm) from base |
| 44++ (or 29++) | 0A36307 | 9 | 94 | 1.10 | 510 | 13.8 | 1" (2.5cm) from rear, 0.35" (9mm) from base |
| 19+ | 0A36280 | 6 | 64 | 1.66 | 940 | 9.4 | Adds 0.5" thickness |
Notes
* - according to PSREF. Actual battery life will differ.
Audio
General
- You can install Dolby Home Theater drivers for a different experience -- it breaks some things but gives you more control. More info here
- Smart Audio stores its setting in the registry: HKEY_LOCAL_MACHINE\SOFTWARE\Conexant\
- You can change the equalizer presets here. Most things are self-explanatory. For gain settings, they are stored dBx10 in signed hex e.g. -14dB -> -1400 -> FFFFFA88h, and +14dB -> 1400 -> 578h.
- Have not bothered to figure out the BW setting yet
Headphone Out
- Also has mic in; OTMP configuration.
- Quality is good enough for everyone except audiophiles. Find measurements with RMAA measurements taken with a Creative X-Fi Music here.
- The Conextant audio driver limits headphone/line out volume unless disabled. To do this:
- Plug in a set of headphones/line out cable
- Open the SmartAudio control panel
- Open the first tab (level settings)
- If using Multi-Stream, click on the headphone icon
- Click the heaphone image above the balance slider
Speakers
- Speakers are pretty crap, unfortunately.
- The graphic equalizer is your friend.
- Night mode helps a bit with low volume.
- Make sure left-right balance is set to middle.
- Someone has sucessfully replaced the speakers with phone speakers. Info here
BIOS
Advanced BIOS
Do not have it? Download here MD5 hash: 38ae7f20e1dfa6d3b5aa034653e0eec7Unlocked BIOS adds these features:
- Whitelist removal
- Unblocked AES-NI
- Unblocked advanced menu
- Unlocked memory speed
- Unblocked AES MSR 0xE2
- New vbios Intel 2119
- 16Gb 1866 + eGPU solved
Advanced BIOS Options
I have changed these options in the BIOS without bricking. Always be careful.Boot Configuration
| Quick boot
| High resolution graphics (disable messes up text)
| Diagnotistic splash screen
| Diagnotistic summary screen
| BIOS level USB
| USB legacy
| UEFI boot
| Legacy boot
| Boot in legacy video mode
ACPI configuration
| ALS support (ambient light sensor)
| FACP PM Timer flag value
Processsor Configuration
| Fast strings (^ speeds up mem copy instruction REP MOVSB)
| Enabled XD
| Machine Check
| Processor Power Management
| | Turbo Mode Power Limit Lock
| | Long/short power limit (maximum 36/56)
| | Processor long/short power limit (max 36/56)
| | Long power limit time (does nothing?)
| | IA curent limit (default is 776 (97A))
| | C-State Auto Demotion (# demotes C1/C3 to C0)
HDD Configuration
| PortTopology
| ALPM Mode Select
Memory Configuration
| Mem freq (will default SPD max)
| Max TOLUD
| OneN Mode Support (command rate)
| Scrambler support (scrambles RAM preventing cold attack)
System Agent Configuration
| Graphics Configuration
| | Aperture Size
| | DVMT Prealloc (actual VRAM size)
| | DVMT Total Gfx Mem
| | Render Standby (RC6 state)
| | IGD thermal control
| | IGB turbo mode
| PEG Port Configuration
| | PCIe ASPM
| | PCIe Active State Power Management
| | | ASPM L0s
| | | PCIe ASPM L1 Support
South Bridge Configuration
| SB PCI Express Config
| | PCI Express Controller DMI Setting
| | PCI Express Root Port x
| | | ASPM
| SB Azalia config
| | Azalia PME (sound card stops working when enabled)
Thermal Configuration
| CPU Thermal Configuration
| | DTS
| Platform Thermal Configuration
| | Active Trip Point Hi/Lo Fan (no effect?)
Notes
^ Read the discussion about fast strings here.
# A more detailed explanation of auto-demotion here.
BIOS Password
The supervisor password is stored on a EEPROM on the motherboard. You can circumvent the password by disrupting ess to the EEPROM chip as you try to login. To do this:- Expose the chip U42 on the motherboard (close to the docking connector pins)
- Prepare to bridge pin 5 and 6 of U42, SCL and SDA respectively.
- A small dot on the chip next to a pin indicates pin 1. Pins count up anticlockwise.
- A small cutout on a chip indicates the top of the chip. Pin 1 is on the left of the cutout. Pins count up anticlockwise.
- Turn on the X220 and wait for the boot logo.
- Bridge the two pins and mash F1.
- If all goes well, it should say give an error along the lines of "DATA data access error"
- Press F1 to continue into BIOS.
- Remove the bridge.
- Set the supervisor password as you please.

Location of U42 is close to the docking connector pins
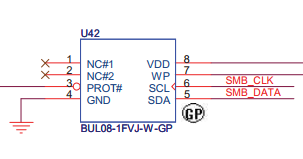
Pinout of the EEPROM chip U42
Timing is key; it took a few tries. The BIOS must be intialized before you short the pins.
Tweaks
General
- Uninstall bloatware
- Trim services
- Disable Power Manager Service - Dynamic brightness control using ambient light sensor, not applicable to the X220.
- Disable Conexant Audio Message Service - no use?
- Disable Conexant SmartAudio Service - no use?
- Lenovo Platform Service - for Windows 8+, disable on Windows 7
- Lenovo Doze Mode Service - Related to Instant Resume, disable if feature not used.
- Trim scheduled tasks
- Run TRON
- Check 4k alignment, TRIM enabled, defrag disable for SSD
- Turn off write-cache buffer flushing
- Install Intel RST drivers
- Update software and drivers
- Immunize system with Spybot S&D
- Run your favorite 'Windows tweak application'
Uncommon
- Create a WiFi hotspot to share your internet connection.
- Change WiFi MAC Address
-
HKEY_LOCAL_MACHINE\SYSTEM\CurrentControlSet\Control\Class\{4D36E972-E325-11CE-BFC1-08002BE10318}\0015
Add a string "NetworkAddress"
Pick 12 hex digits, making sure the second digit is even e.g. xExxxxxxxxxx
Reset network adapter - Change LAN MAC Address
-
HKEY_LOCAL_MACHINE\SYSTEM\CurrentControlSet\Control\Class\{4D36E972-E325-11CE-BFC1-08002BE10318}\0012
Add a string "NetworkAddress"
Pick any 12 hex digits
Reset network adapter
Can also be changed in LAN adapter properties in Device Manager - Enable remote desktop server in WIndows 7 Home Premium, here
- Enable disconnected devices in Device Manager
- Open an elevated command prompt
- Run "SET DEVMGR_SHOW_NONPRESENT_DEVICES=1"
- Open Device Manger
- Open Device Manger -> View -> Show hidden devices
- Restart OSD
- Create a batch file with the below:
-
taskkill /f /im tponscr.exe
net start TPHKSVC
net stop TPHKLOAD
net start TPHKLOAD - Run with eleveated priveliges
Power Saving
I get ~3.5W with screen OFF, Maximum Battery profile, airplane mode, no WWAN installed, IPS display, no USB devices, BX100 250GB SSD. This translates to 26.1 hours of battery life with a 94Whr 9-cell battery. This is a completely unrealistic situation though.I get ~5.0W idling with minimum brightness and conenect to WiFi. This translates to 18.8 hours of battery life with a 94Whr 9-cell battery.
I get ~10W doing light tasks at a reasonable brightness level and conenect to WiFi. This translates to 9.4 hours of battery life with a 94Whr 9-cell battery.
- Requires GRUB to change FACP values in the BIOS before booting into Windows. Add the below to your grub config. You may experience lockups when resuming from sleep.
-
menuentry 'Windows 7' {
insmod part_msdos
insmod ntfs
# Change drive as necessary
set root=(hd0,2)
# Enable ASPM
# Change IA_PC_BOOTARCH (ASPM support bit)
# If using 64MB VRAM use - # Byte location changes depending on memory config. Check your own system first.
write_byte 0xDAFE706D 0x03
# Fix checksum
write_byte 0xDAFE709 0x30
chainloader +1
boot
}
- Enable D3 state on sound card (negible power saving?)
-
HKEY_LOCAL_MACHINE\SYSTEM\ControlSet001\Control\Class\{4D36E96C-E325-11CE-BFC1-08002BE10318}\0007\PowerSettings
CoversationIdleTime - does nothing?
IdlePowerState - (D) 0,1,2,3
PerformanceIdleTime - idle time
Example:
PerformanceIdleTime = 0x0000012c (300 seconds), and IdlePowerState = 0x00000003 (device power state D3). - Change LAN settings for power saving
- Use Performance Monitor to check which applications causes wakeups regularly and close them on battery.
- Run "powercfg -energy" and eliminate problems. Ideally, you should see no errors.
- USB not suspend problems
- Remove/disable USB devices
- Enable USB Selective Suspend with Gobi 2000 WWAN card
- Edit package.xml in extracted installer to include "ss=1". Read the installer readme for more options.
- If webcam (USB\VID_04F2&PID_B217) does not suspend, restart the Lenovo Camera Mute service.
- Fixing a problematic device solves the suspend errors for the USB hub as well
- If the the sound card does not suspend try the follow:
- Stop audio sources
- Close SmartAudio control panel if open.
- Disable and re-nable suspected busy output and input devices in Sound Control Panel.
- Timer Resolution Request warnings
- Some applications increase timer resolution when responsiveness is required. Close these if not needed.
- Set IA32_ENERGY_PERF_BIAS register (address 0x1b0) in CPU MSR for power saving bias.
- Maximum Battery profile automatically changes register to 0 (maximum power saving).
- Power Optimized profile automatically changes register to 5.
- Maximum Performance profile automatically changes register to 7 (maximum performance).
- There is approximately 2.5% difference in performance between level 0 and 7 when running Pi benchmark.
- Use RW Everything to manually change the register.
Miscellaneous
General
- 'Fn' can wake the laptop from sleep.
Bluetooth
- The Bluetooth 4.0 card (FRU 60Y3303 & 60Y3305) has better range and recption that the Bluetooth 3.0 card (FRU 60Y3271 & 60Y3275).
- Most Bluetooth connectivity problems can be solved by:
- Enabling 'Bluetooth Discovery' under Bluetooth Settings.
- Disabling "Allow the computer to turn off this device to save power" in Power Management tab of the Bluetooth device properties in Device Manager.
WWAN
- SIM card is inserted with chip towards in the display and missing corner visible.
GPS
- First time using GPS takes a life time to lock on.
- Following uses are slightly faster.
WIFI
- It is possible to install a mPCI-E to NGFF M.2 (A+E) adapter to use newer WiFi adapters.
- IPEX MHF4 to IPEX MHF1/u.FL adapter will be needed for the different antenna connectors.
Accessories
Docking Stations
- Mini Dock Plus Series 3 (4338)
- My dock of choice - plenty of ports, easy to dock/undock one handed, comfortable to use the laptop when docked, and compatible with other Thinkpads. No real negatives.
- Some have USB 3.0 to use with the X230.
- Mini Dock Series 3 (4337)
- Similar to Plus version except missing one DisplayPort, one DVI, and eSata.
- Some have USB 3.0 to use with the X230.
- Port Replicator Series 3 (433610W)
- Basic port selection; not recommended.
- Some have USB 3.0 to use with the X230.
- Ultrabase 3 (0A33932)
- Good selection of ports for it's size, has an Ultrabay for a DVD/HDD (Ultrabay battery not compatible). But. It is rather awkward to undock with one hand as there is not good place to pivot off to pull the latch. I end up pushing off the laptop, causing it to rotate out of the dock, possibly scratching the underside...You are also supposed to press the undock button on the side before undocking to safety unmount the Ultrabay device - a small nuisance. There are two metal tabs at the front of the dock which is suppose to ground the dock/laptop via the foam pad on the X220 near the speakers. The tabs end up scratching off the coating near the foam bits on the laptop. Finally, the whole setup is super thicccc . The palm rest ends up about >1.25" above the desk. It is really awkward to type on...
Expresscard Devices
There is not really that many useful Expresscard devices aside from eGPU or unless you need a specific port. Here are some things you can fit in there:- A blank, duh, Despite what people say on the internet, this does not reinforce the palmrest over the EC slot.
- A 3D printed SD card/Unifying receiver holder. Cool!
- A port you need e.g. USB 3.0, more USB 2.0, Firewire, SATA, serial, card reader etc.
- Remote/presenter (unfortunately this is not flush with the slot)
- Bluetooth mouse
- Smartcard reader
- Wifi/WWAN//LAN card
- TV tuner
- Sound card
- SSD (not bootable without Coreboot)
- Addon Expresscard from FHD/WQHD mod - adds a mSATAIII, USB 3.0 port, and internal USB 2.0 port.
Mod Ideas
Additional PCIE Link
On non-i7 versions of the X220, the 1xPCIE lane for USB3.0 is unused. This lane is routed to where the USB3.0 chip would sit. It may be possible to solder wires to these pads for an additional PCIE lane for eGPU use. C225 and C226 would need to be soldered on as well; the capacitance does not matter as it is just there to AC couple the signal.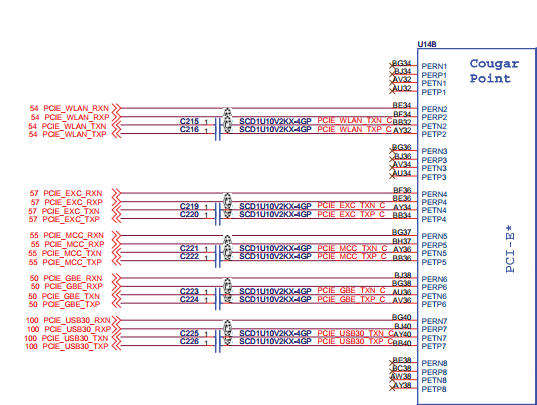
PCIE configuration

Location of the USB3.0 chip
USB NFC Reader
The fingerprint reader is connected via USB via a split ribbon cable which also carries PS/2 for the touchpad. It is possible to repurpose the fingerprint model ribbon cable and connect something else such as this or other thin USB device. The cable only carries 3.3V though which limits what can be connected. The device will require a modified connector to interface with the ribbon cable, be thin enough to sit where the fingerprint reader is, and be able to run off 3.3V. If only NFC was useful on a laptop....
Fingerprint reader ribbon cable carries 3.3V and USB data lines.
Additional Antenna
X220 are limited to 4 antenna plus webcam or 5 anntena without webcam. There is indeed not enough space to fit 5 antennas and a webcam in the LCD bezel. However, it is possible to install a flexible antenna somewhere else in the chassis. Somewhere like the palmrest could be suitable location. The foil on the underside of the palmrest needs to be removed of course for reception. I may try this if I decide to upgrade to a 3x3 wireless card.
Thin antenna that can be stuck somewhere (Source:Taoglas)
Additional USB Port
Some modder has developed a nifty little circuit board which replaces the Bluetooth Daughter Card (BDC) with a full sized USB port and fitted a Logitech Unifying reciever -- genius. Of course this means you lose Bluetooth unless you have a WiFi card with Bluetooth.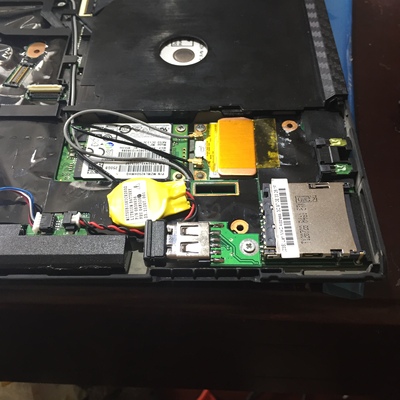
Nifty place for a Unifying reciever (Source:Taobao)
Additional space
Some 2.5" SSDs are smaller than their case. By removing the case and connecting the circuit board directly to the SATA/power connector you gain a bit of space for modding. Some ideas for what to do with the extra space: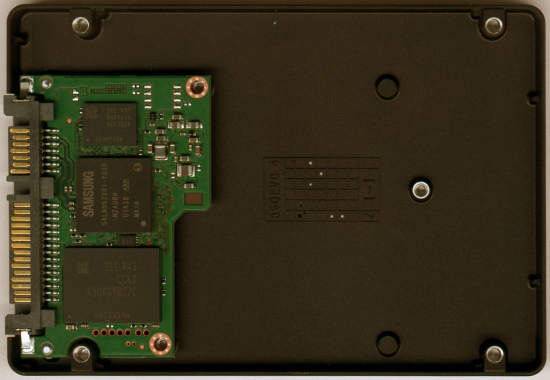
Not all 2.5" SSDs are 'full' (Soruce: CDRLabs)
- Add an external WLAN/WWAN antenna connector on the HDD cover.
- Add an a USB dialup modem for desperate moments/nostalgia/for kicks.
- Add some USB card reader.
- Add more USB ports.
My X220
Specifications
| Component | Part |
| CPU | Intel Core i5-2520M (2.5GHz, 3.2GHz Turbo, 3MB cache) |
| OS | Windows 7 Home Premium + Linux Mint |
| Display | 12.5" 1366x768 LED IPS - LG125WH2-SLB1 |
| Memory | 2x4GB 1600MHz CL9 DDR3 |
| Storage | 250GB SSD |
| WiFi | Intel Centrino Advanced-N 6205 2x2 agn |
| WWAN | Gobi 2000 Sierra Wireless EV-DO/HSDPA |
| Bluetooth | Thinkpad Bluetooth 4.0 |
| Battery | Thinkpad 29++ 9-cell 94Whr & 29+ 6-cell 63Whr |
| Weight | 3.23 lb (6-cell) / 3.68 lb (9-cell) |
| Purchased | August 2011 direct from Lenovo |
Long Term Review
Pros: (in no particular order)- Reliable, portable, and modular.
- Good battery life
- Decent IPS screen - contrast, and brightness.
- Excellent input devices
- Visual status indicators
- Fast enough for everything but heavy 3D work.
- Display - IPS bright spots, limited to 1366x768, only 65% coverage of sRGB.
- Heat - ~90C core temperature at maximum load even after repasting.
- Lid design - metal tabs holding plastic lid prone to breaking. Lid and palm rest contour not matched. Small bumps on edge of lid dig into palm rest causing weakspots near touchpad. Would have liked a physical latch instead of the ineffective magnetic latch.
- Plastic - corners of LCD bezel and palmrest are prone to chipping off. Thin plastic bezel near touchpad prone to cracking.

My trusty X220 after years of use
Disclaimer
All information may not be 100% correct. Sources of information are referenced where applicable.Reference Documents
- X220 Specifications
- X220 Hardware Maintenance Manual
- X220 Schematic Diagram
- X220 Circuit Board Layout and Viewer
- X220 LCD Datasheets
- Conexant CX20672 Audio Codec Datasheet
- Sandy Bridge Mobile CPU Datasheet Volume 1
- Sandy Bridge Mobile CPU Datasheet Volume 2
- Intel 6-Series Chipset Datasheet
- X230 FRU Parts List
- Lenovo Product Specification Reference 2005 - 2013
Links
X220 Links
- X220 Drivers
- Lenovo Parts Lookup
- ThinkPad Battery 44 (4 cell), ThinkPad Battery 44+ (6 cell) and ThinkPad Battery 44++ (9 cell) - Overview
- ThinkPad Battery 19+ (6 cell Slim External) - Overview
- ThinkPad External Battery Charger - Overview and Service Parts
- Battery Recall
- ThinkPad Mini Dock Plus Series 3 - 90W - Overview and Service Parts
- ThinkPad Mini Dock Series 3 - Overview
- ThinkPad Port Replicator Series 3 - Overview
- ThinkPad Ultrabase Series 3 - Overview
- Lenovo Thinkpad X220 Solutions
- Correct orientation for ThinkPad X220 SIM card - WWAN card does not detect SIM
- Keeping Your ThinkPad Clean
- Keyboard service parts - ThinkPad X220, X220i
- X220 Touchpad jumpy response when used with 90w slim AC adapter - Firmware update
- X220 CPU throttles back to low clock rate while on AC with 65W adapter - prior to BIOS 1.21
- Noisy fan for Thinkpad X220 / X220 Tablet
- Dolby Home Theater for your ThinkPad!
- Thinkpad x220 speaker upgrade [GUIDE]
- ThinkPad x220: problem with a custom BIOS
- [Notebook machine] [original] 4-core CPU, SATAx3, USBx5 Sharp WQHD 2K IPS screen Thinkpad x230P ultimate transformation
- Notebookcheck Review
- ThinkWiki X220
- McDonnellTech ThinkPad X220
- ThinkPad X220 (i/T) Owners Thread
- X220 IPS display problem - weird bright spot on the screen
- x220 Idling at 4.95w - What About You?
- Thinkpad Keyboard Identification
Other Links
- ThinkPad Serial ATA Hard Drive Bay Adapter III - Overview
- MarkC Windows Mouse Acceleration Fix/a>
- [Guide] How to overclock and change timings for any RAM on most laptops
- DIY eGPU experiences
- Black Viper
- TRON
- About the Wireless Hosted Network
- Concurrent RDP Patcher Enables Remote Desktop in Windows 7 Home Premium
- How to Enable HIPM and DIPM for your SSD and HDD in Windows 7 and Windows 8
- HShow/hide all hidden settings in Win7 Power Options
- Advanced Settings for Intel® Ethernet Adapters
- Thinkpad Reddit
- [GUIDE] Dell E6530 CPU TDP/multi unlocking
- *HP EliteBook 2560p Owners Lounge*
- HP Elitebook 2560P Owner's Lounge [version 2.0]
- 12.5" HP Elitebook 2570P Owner's Lounge
I would like to flash the modified BIOS and check the Boot Configuration -> Boot in Legacy Video Mode [Enabled] option. Can you check if the change to [Enabled] will not brick the computer? Do you still use version 1.43. At the moment there is version 1.46 mod - http://x220.mcdonnelltech.com/resources/
ReplyDeleteDrill some holes like this:
ReplyDeletehttps://forum.51nb.com/data/attachment/forum/month_1306/20130629_c1ca1a0846a6ec56e8bdCTk7WgQ1pKBj.jpg
Hello, how could you reach 7w per hours? I have i7-2640m, the lowest possible is 9w, which is high... I want it to be like yours... if possible :|
ReplyDeleteWhen browsing web, I could reach 17w, which is very high... I just hope to keep this X220 forever... (new thinkpad keyboard doesn't have thinklight :'( sadd )
I disable Hyperthread, still the lowest about 7-8W only... never reach 5W on Windows 10. Does yours using Windows 7 when tested? Thank you.
DeleteI think I found the answer... 10W light task, then it's because of Windows 7.. I just installed windows 7 with this laptop, because Windows 10 broken down because of update, and I am in short of time to work on project, and Windows 7 is stable, no update or bullshit or whatsoever, so I install it to my SSD, the cheapest one, and it works well, as I can see, but I only reach 6-7w when idle, it's sad tbf... I hope lower than 7w... but it's better than using windows 10 with average 11w... thank you! I will kept using it till my heart content, and I hope ESU update come till 2026, like it should... Hehehe...
Deletehi, give me an email if you want to add the FRU list for X220 T420 20 series keyboards to this blog post, it is offline now
ReplyDelete